Speaker Tab
The Speaker tab gives you controls to select loudspeakers and adjust the EQ for each channel. In addition, you can create and save three different EQ scenarios.
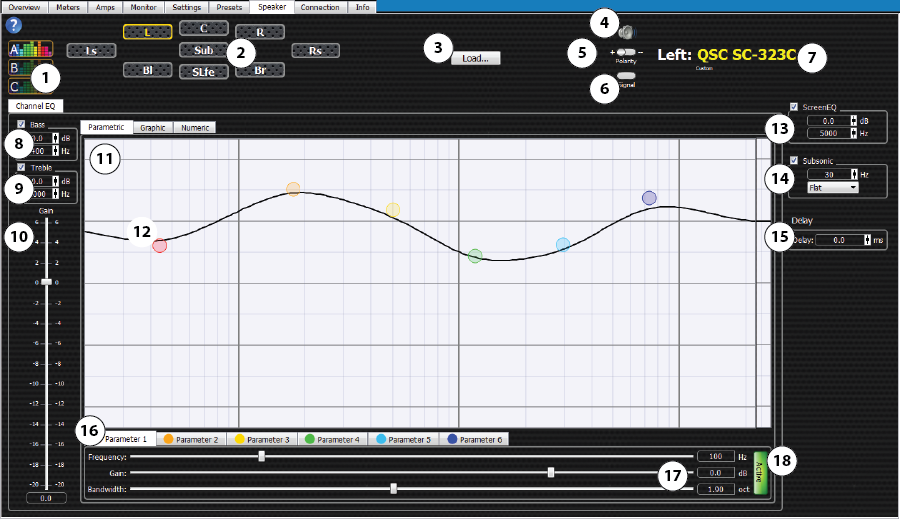
- EQ Scenarios – All three scenarios (A, B, or C) start with the factory settings. The parametric EQs, Graphic EQs, Bass, Treble and Gain can be modified for each EQ scenario. Additionally you can copy the EQ settings from one scenario to another for a channel by dragging the EQ graphic from one EQ to another. Screen EQ, Subsonic filter, Delay and Speaker Band processing do not change with the EQ selection.
- Speaker Channels – Click on the desired channel icon to modify that channel’s EQ. The speaker channels available depend on choices made on the Settings tab. You can copy settings from one speaker to another of the same type (screen to screen, surround to surround, etc) by dragging the channel icon you want to copy from to the channel icon you want to copy to.
- Load... – Use the Load button to select loudspeakers for the different channels. If you use Custom loudspeakers, you must create Speaker Profiles before you can load the Custom loudspeakers. Refer to the To Select Speakers paragraph below.
Save...  Available only when Custom loudspeakers are used. See additional information below.
- Mute on / off – Mutes the selected channel at the output of the DPM / input to the Amplifiers.
- Polarity + / - switch – swaps the negative and positive signals to the selected speaker. This is used in case a loudspeaker was wired incorrectly.
- Signal switch – Turns the Pink Noise on or off for the selected channel. The Pink Noise / Tone switch in the Master control box on the Overview tab must be ON for the signal to be fed to the channel.
- Model or name of the loudspeaker assigned to the channel. If you use QSC loudspeakers "QSC" and the model number displays. Custom loudspeakers display the name you gave to the associated speaker profile.
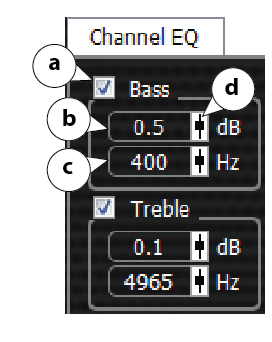
- Channel EQ Bass – For the selected channel. Low-shelf filter. Controls the level (b) of a range of frequencies below the set frequency (c). Use the check box (a) to turn the filter on or off. Use the fader (d) to adjust the gain and frequency. Not available for sub-woofer channels.
Bass Gain range = -10 dB to +10 dB.
Bass Frequency range = 20 Hz to 400 Hz.
- Channel EQ Treble – For the selected channel. High-Shelf filter. Controls the level of a range of frequencies above the set frequency. Controls are the same as the Bass controls. Not available for sub-woofer channels.
Treble Gain range = -10 dB to +10 dB
Treble Frequency range = 1 kHz to 22 kHz
- Channel EQ Gain – Adjusts the overall channel gain.
- Parametric graph – Displays a visual representation of the parameter settings of frequency, level, and bandwidth.
- Parameter adjustment handle – Click and hold the handle, then drag it to the spot you wish. This controls both gain and frequency. Use the mouse wheel to adjust bandwidth. There is one color-coded handle for each parametric.
- Screen EQ – High-shelf filter to control the Gain above the selected Frequency. Available only when one of the Screen Channels is selected. The parameters are set for each Screen Channel individually.
Gain range = -10 dB to +10 dB
Frequency range = 20 Hz to 22 kHz
- Subsonic – Frequencies from 15 Hz to 80 Hz – Use the drop-down list to select either Flat or B6.
- Delay –
- Parametric Parameter Tabs – Color-coded to match the handles on the graph. Click one of the tabs to select that parameter for adjustment. Use these tabs when you want to adjust the parameter sliders instead of the parameter handles on the graph - this works well when you don't want to accidentally move the parameter handle. Graph and these tabs not available on the Sub and SLfe channels. Use Numeric tab instead.
- Parametric adjustment sliders – Use to adjust the parameters of the selected Parametric. You can click and drag the slider, or click the digital readout on the right end of the slider to key in a value.
- Frequency range = 20 Hz to 22 kHz
- Gain range = (minus) -18 dB to (plus) +6 dB
- Bandwidth range = 0.05 octave to 4.0 octave
- Active – Click to activate or deactivate the selected parametric.
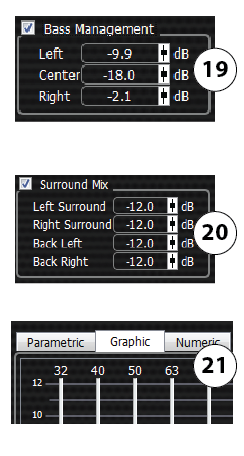
- Bass Management – Controls the mix of low frequencies coming from the screen channels to the Sub. Available on the Sub channel only. By default, the Bass Management is not enabled. Click the check box to enable, then use the faders to adjust the mix gain for Left, Center, and Right.
NOTE: If Bass Management is enabled here, it is always on. If it is not enabled here, it can be enabled for specific Presets on the Presets tab.
- Surround Mix – Available on the SLfe channel only. Use the faders to create the mix you want from the surround channels to the SLfe channel.
- Graphic Equalizer – Each channel, except the Sub and SLfe, has a 28 band Graphic Equalizer available.
- Click the Graphic tab to display.
- Click the Reset Gain button at the bottom of the graphic equalizer to reset.
- Numeric Tab – Provides a simplified means to directly enter the desired Parametric settings.
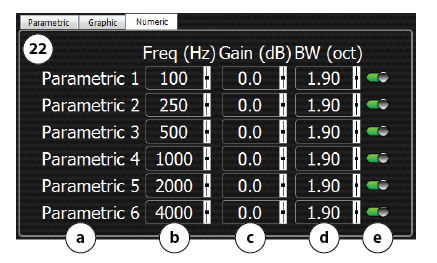
- Freq range = 20 Hz to 22 kHz
- Gain range = (minus) -18 dB to (plus) +6 dB
- BW range = 0.05 octave to 4.0 octave
To Select Speakers
DPM Manager must be in Design mode to load a speaker processing file.
QSC Intrinsic Correction Speakers 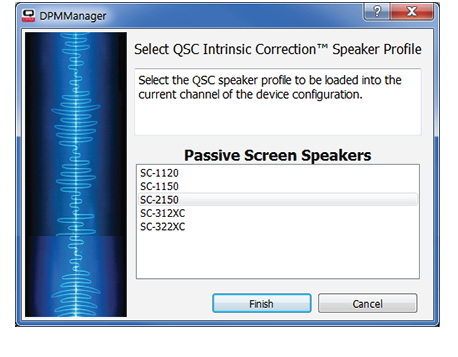
(Selected on the Settings tab)
- Click Load... –
- Select one of the listed QSC loudspeakers. All the loudspeakers in the list are for the selected type of channel and crossover if you are working on a Screen channel.
- Click Finish. The loudspeaker is loaded for all of the same type of channels. The corresponding Intrinsic Correction settings are loaded to locations in the configuration reserved specifically for these settings and will not use or be shown in the user-accessible EQ controls. For screen speakers in two-way mode, the Speaker Band tab is not available as the Intrinsic Correction settings include highly optimized crossovers and band EQ. All other EQ controls are available The example at right shows Screen channels, and passive crossover.
User Customized speakers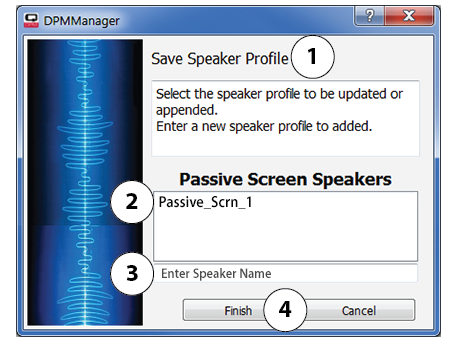
(Selected on the Settings tab)
NOTE: If you have already saved some Custom loudspeakers, skip to Load Custom Settings.
To Save custom settings:
- Set the parameters for Parametric EQs, Subsonic, and Speaker Band EQ.
- Click Save... – the Save Speaker Profile (1) dialog displays.
- If you are updating a Speaker Profile, select the speaker name you want (2). The name displays in the "Enter Speaker Name" field (3).
- If you are saving a new speaker profile, click in the Enter Speaker Name field (3) and type a new name. Do not use spaces in the name. You may use underscores.
- Click Finish (4). Your settings are saved to a speaker profile file. The example at right shows Screen channels, and passive crossover.
To Load custom settings:
- Click Load... –
- Select one of the listed custom loudspeakers. All the loudspeakers in the list are for the selected type of channel and crossover if you are working on a Screen channel. Click Next.
- Select the channels you wish to load the loudspeaker settings to (only channels of the same type are shown).
- Click Finish. The loudspeaker settings including Parametric EQs, Subsonic, and Speaker Band EQ are loaded for all of the selected channels.
© 2016 QSC, LLC. All rights reserved.
