Venue Configuration Management

Venue Tab

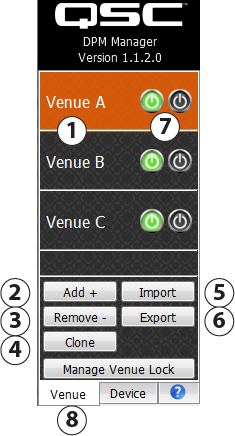
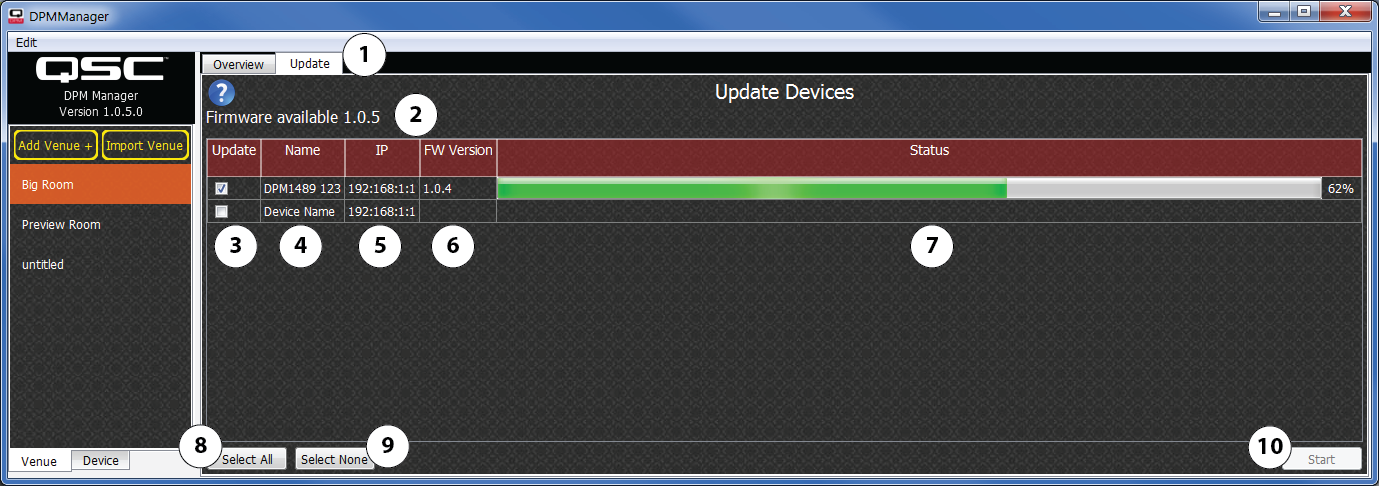
  1. List of Venues – Displays a list all Venues you have added and / or imported. The orange bar indicates the selected Venue.
  2. Add Venue – Click to add a Venue named "untitled" to the list of Venues. Click the name to change it.
  3. Remove Venue – Select a Venue from the list you wish to remove, then click this button to permanently remove the selected Venue.
  4. Clone Venue – Select a Venue from the list you wish to clone (duplicate), then click this button to clone the selected Venue. The word "copy" is appended to the Venue name.
  5. Import Venue – Click to display an "open file" dialog where you can navigate and open an existing Venue file xxx.json. Opening this type of file imports the Venue information into your DPM.
  6. Export Venue – Displays a "save file" dialog where you can navigate to the folder you want, then click the "save" button to save the file with a .json file extension.
  7. Turn On/Off Venue DPMs – click on the left button to turn on all DPM devices or the right button to turn off all DPM devices.
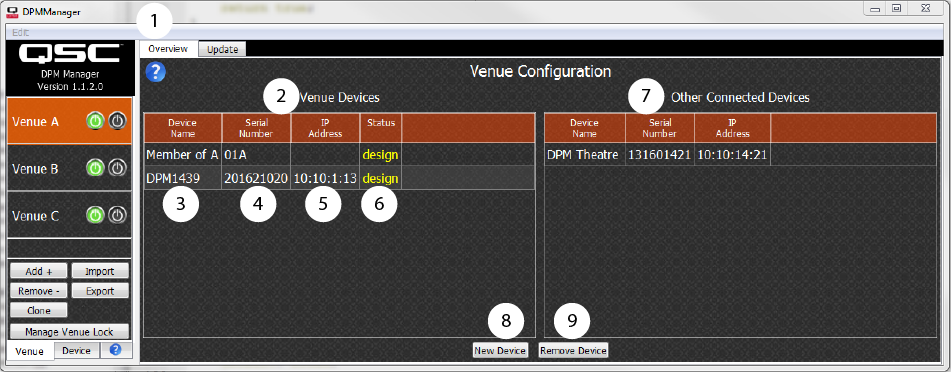
  8. Venue Tab – Provides access to the Venue Configuration Overview tab and the Update tab.

Overview Tab

  1. Overview Tab – Provides access to Venue Devices, and Other Connected Devices.
  2. Venue Devices – Displays a list of devices associated with the selected Venue. . Devices can be added to a venue by dragging a connected device from the ‘Other Connected Devices’ list or clicking on ‘New Device’. Devices can be deleted from the venue by dragging them to the other list.
  3. Device Name – By default, this name is the network-name of the device. You can change the name on the Device tab > Connections tab.
  4. Serial Number – Identifies the device. Use this number for registration.
  5. IP – The IP Address of the device. Used for network communication.
  6. Status – The current state of the DPM, either online or offline. A DPM that is online can be in either ‘Live’, ‘Design’, or ‘Out-of-Sync’ mode.
  7. Other Connected Devices – Lists other devices that are connected to your computer or to the network, that are not in the selected venue. A device in this list can be added to a venue by dragging it to the Venue Devices list of the selected venue.
  8. New Device – Click this button to manually add a new device to the selected Venue. Use this if you are working offline. Refer to Add Device below.
  9. Remove Device – Click this button to remove the selected devices from the Venue.

Add Device

Manually add an unconnected DPM to the Venue.

  1. Network Name: – The default network name can be found on the front panel home screen. The network name is DPMxxyy, where xxyy are the last four digits of the serial number.
  2. Serial: – The serial number can be found on the rear panel label, or on the front panel Status screen.
  3. IP Address: – The IP Address can be found on the front panel Status screen, The default IP Address is comprised of 10.10.xx.yy where xx and yy are the last four digits of the serial number.
  4. Click Finish when you have entered the information.
  5. Click Cancel to close the dialog without saving the information.

NOTE:  If you connect the new DPM to a computer that is running DPM Manager, you can simply drag the DPM from the "Other Connected Devices" to the "Venue Devices".

Venue Lock Management

Venue Lock Management allows the complete lockout of configuration information so that the user who monitors the DPM performance is unable to accidentally change its configuration. Master Volume, and Standby can still be changed, but speaker configurations cannot.

From the screen below you have three options:

The first option (below) allows you to lock the venue. If no password has been specified, a new password will need to be provided. Enter the new password and confirm it.

The second option (below) allows you to unlock the previously locked venue. You will need to provide the valid password to unlock the venue.

The third and final option (below) allows you to change the password of the venue. If the venue is locked, it will be necessary to provide the old password before changing it.

Update Tab

  1. Update Tab – Provides access to controls for updating the firmware on your DPM.
  2. Firmware available n.n.n – This is the latest firmware version available with the current software.
  3. Update – Click the check box next to the DPMs you wish to update.
  4. Name – Displays the Network Name of the device.
  5. IP – Displays the IP Address of the device.
  6. FW Version – Displays the currently installed version of firmware.
  7. Status – Prior to starting the update process, a message displays indicating if the firmware for a DPM needs to be updated or not. A green status bar and a percentage-done number at the far right displays during the update process.
  8. Select All – Click this button to select all DPMs in the list.
  9. Select None – Click this button to remove any selection check marks from the list.
  10. Start Update – Click this button to start the updates on the selected DPMs. Once the new firmware has been transferred to the DPM, it will automatically reboot and complete the internal firmware update.

NOTE:  Updates are done simultaneously without loss of performance if more than one DPM device is selected. Go ahead and select all devices that need new firmware and update all at the same time.


© 2016 QSC, LLC. All rights reserved.